You have a Google Sheet and want to trigger an automation in Make immediately after you have added a new row. Without using an external trigger.
If this is the use case you want to implement, then you are at the right address! In this tutorial, I will show you how to watch changes in google sheets from make scenario.

Table of Contents
ToggleHow this workflow works:
Make and Google sheets are two different web applications.
In order to combine them, we need a way to communicate with each other.
There are multiple ways to do this. In this example we will use a webhook that is being called from Google sheets as soon as you update the title row.
This webhook is defined in our Make automation and as soon as it receives a message, it will automatically trigger a workflow run.
What do you need for this workflow:
In order for this workflow to function, you only need two things:
- Google sheets
- Make.com account
Make sure you have those before you continue.
Set up a new scenario in Make
The first thing you need to do is to create a new scenario in Make.

In order to do this, log into your Make.com account (or create a free account), Navigate to Scenarios and click “Create a new scenario” on the top right of your screen.
You will be forwarded to your scenario UI where you can continue to set up the trigger.
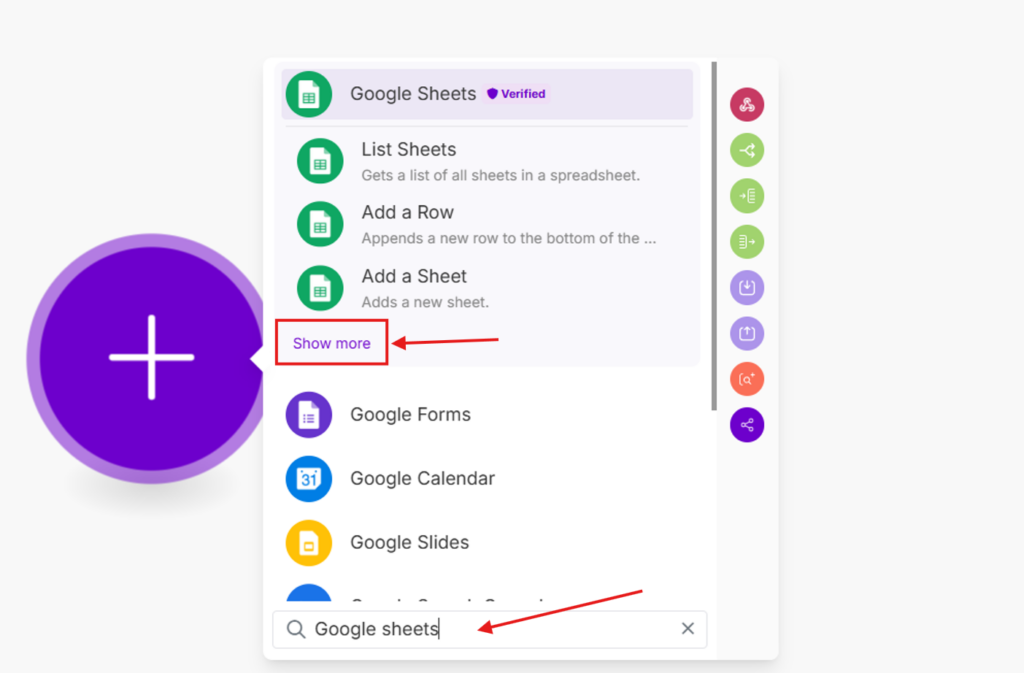
To create the trigger, click on the big plus icon in the middle of the screen, search for “Google sheets” and click on “show more” to see more actions that are provided by the module.

You should be able to find an action that is called “Watch Changes” with an INSTANT and ACID tag.
Click the “Watch Changes” action and continue.
Create a webhook to watch changes in Google Sheets

After you’ve selected the correct action, you should get a small popup (like you see in the image above).
The little, green lightning sign on the bottom left of the node indicates that this action will be triggered by an event other than the scheduler. The event, in this example, is an external call to the webhook.
And that’s what we are going to create now. Select “Create a webhook” and continue.
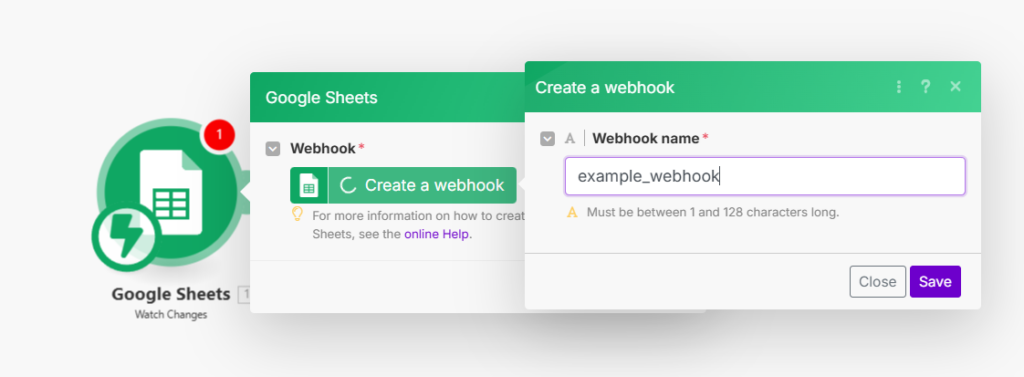
You will get another popup where you need to define the webhook name. Choose a webhook name that is related to your workflow and click on Save to continue.

Now, you have successfully created the webhook and we can set up the Google Spreadsheet.
But before you do that, I want you to click on “Copy address to clipboard” because we will need it soon!
Set up and prepare the Google Spreadsheet
Next, you need to create the google spreadsheet that you are going to connect to your Make Automation.
Of course, you can reuse an already existing one but I would suggest to do it once like it’s described in this tutorial and fully understand how it’s set up first.

Navigate to docs.google.com/spreadsheets/ and create a new spreadsheet by clicking on “Blank Spreadsheet”.

Give your spreadsheet a name (so you can find it afterwards) and add “Title” in Cell A1 and “Status” in Cell B1 as you the in the image above.
Install “Make for Google Sheets” Add-On
The easiest way to connect Make with your Google Sheets is to download an already existing Add-On, called “Make for Google Sheets” which has been developed my Make themselves.
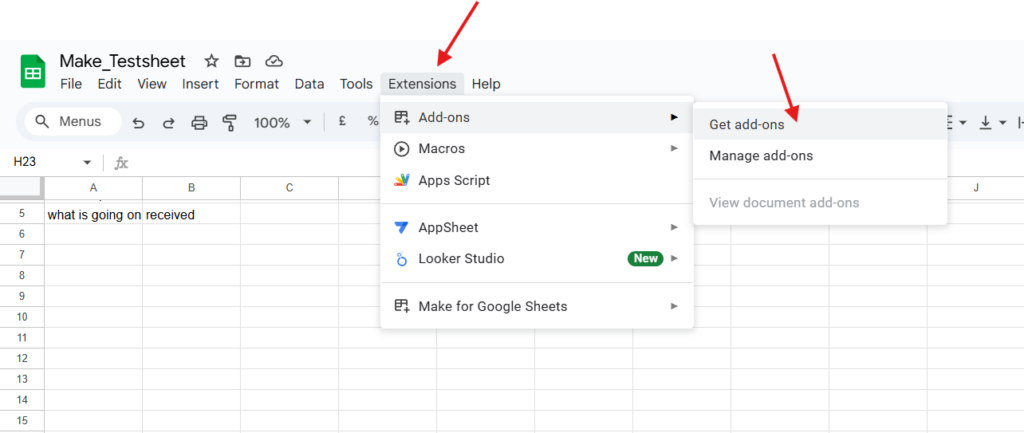
In order to install the extension, click on “Extensions” in the top-menu, and navigate to “Add-ons” –> “Get add-ons” in the sub-menu.
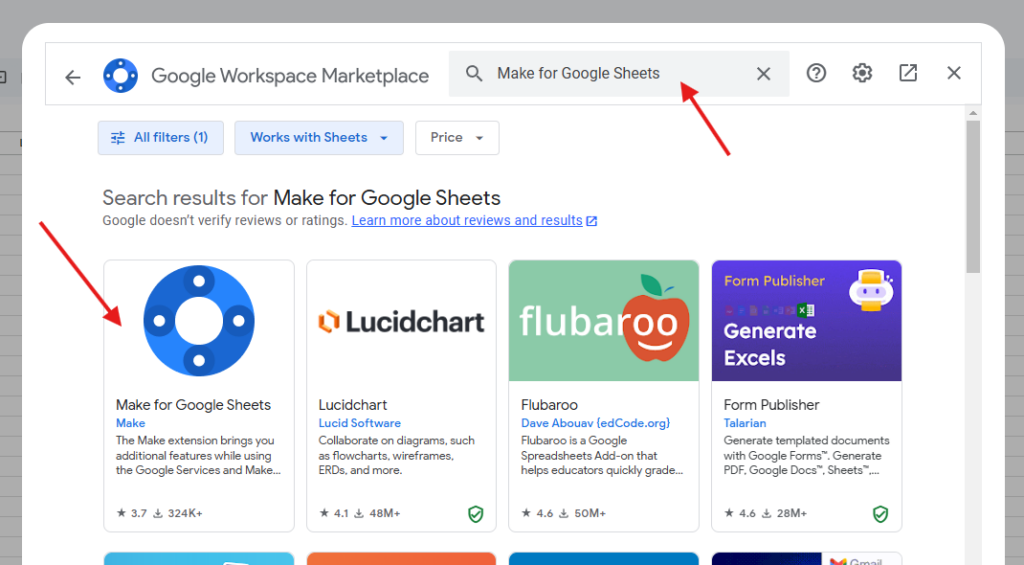
A new popup with the Google Workspace Marketplace will open.
Type “Make for Google Sheets” into the search bar, press enter and select the “Make for Google Sheets” Add-On.
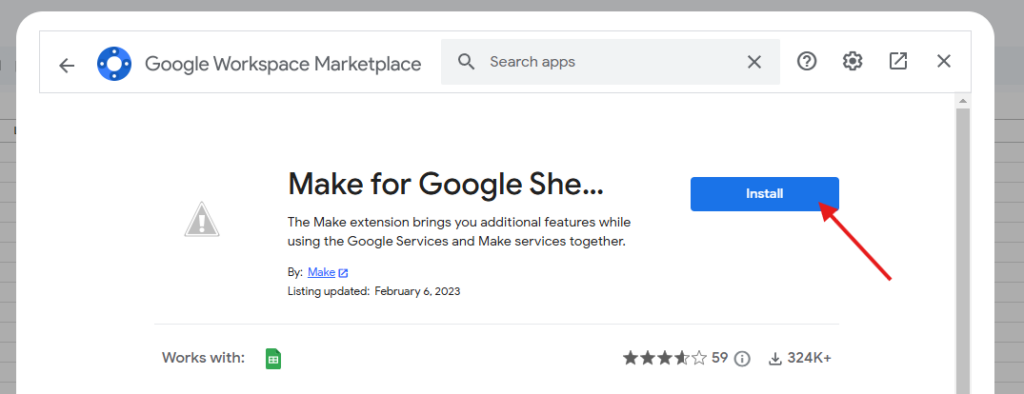
You will navigate to the Add-Ons page and you might also see the grey warning sign. Don’t worry! It’s only because the image for this Add-On couldn’t be loaded.
Click on the “Install” button next.
You will be forwarded to some Google Authentications. In order to connect both Make and your Google Sheets, Make needs to have access rights. Grant the requested access and continue.
Configure “Make for Google Sheets” Add-On
Next, we are going to set up the Add-On we have just installed.

Navigate to “Extensions” –> “Make for Google Sheets” –> “Settings“. Click on Settings.
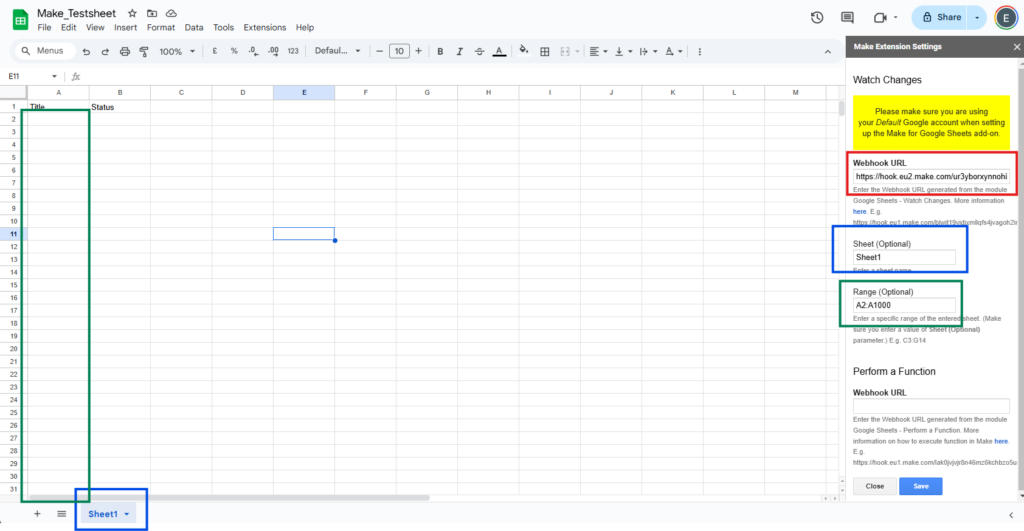
A new sidebar opened on the right side of your screen where you can configure the Add-on.
- You need to paste the webhook URL that you have copied from the “Create a webhook… ” step before.
- Put in the sheet (name) that you want to watch. In this example we only have one sheet that is called “Sheet1”
- Put in the (cell-) range that you want to watch. In our example, we will watch the titles that will be added in the A column after “Title”.
Note: Only the cells in the defined cell-range will actually be watched! If you are going to add something anywhere else, like C5 for example, the Make automation will not be triggered.
Click on “Save” and wait for the little notification popup that the changes have been saved.
Adjust Make workflow to update a row in Google Sheets
The webhook has been set up and the workflow could already listen to it. But before we activate the workflow, we will add another step that can indicate, within the Google Sheet, that the change has been received and the automation has been started.
For this, we will ask the automation to update the “Status” column for each new “Title” that we added to our list.
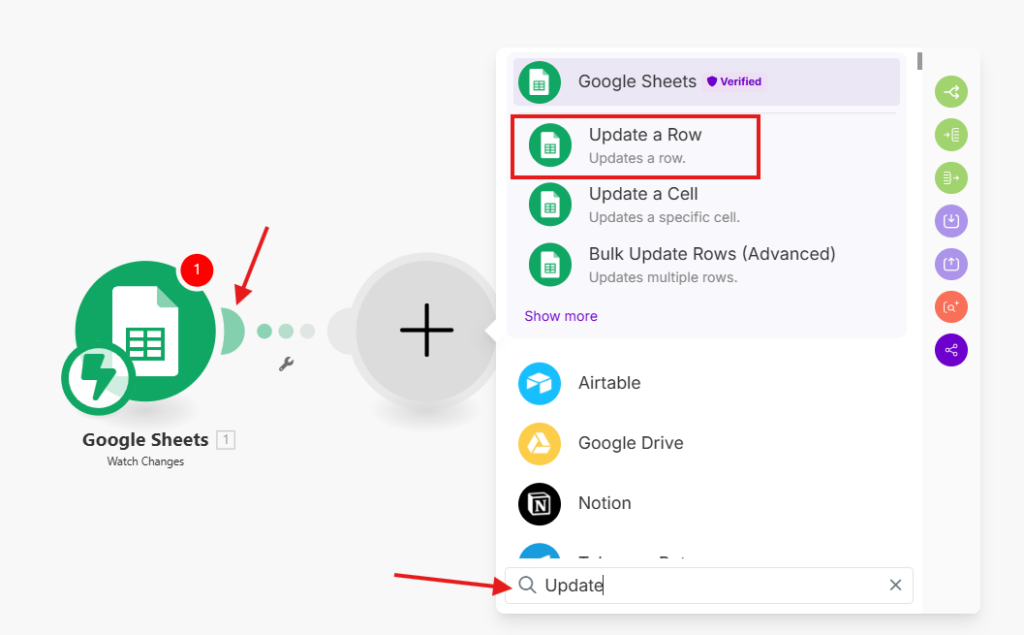
Click on the small + sign on the right of the current “Google Sheets – Watch Changes” node.
A new, empty node will appear on the right and you can define the next workflow step.
For now, type “Update” in the search bar below and select the “Update a Row” Action from Google Sheets.
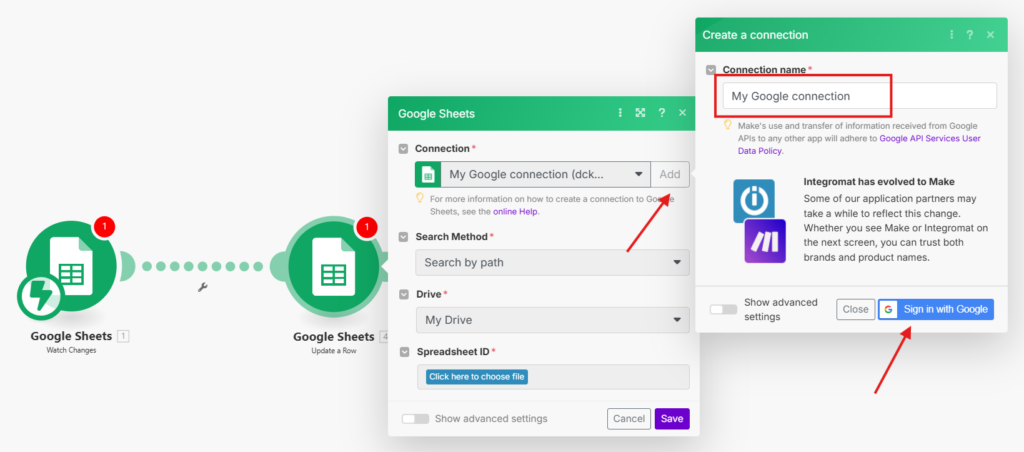
The configuration window for the new action will pop up and the first thing you need to do is to select your Google connection.
If you don’t have a Google Connection set up, yet, click on “Add”, select a name for the connection and “Sign in with Google”.
You will be asked to select a Google account and authorize Make again. Select the Google Account that is linked to your Google Sheets and allow the authorization.
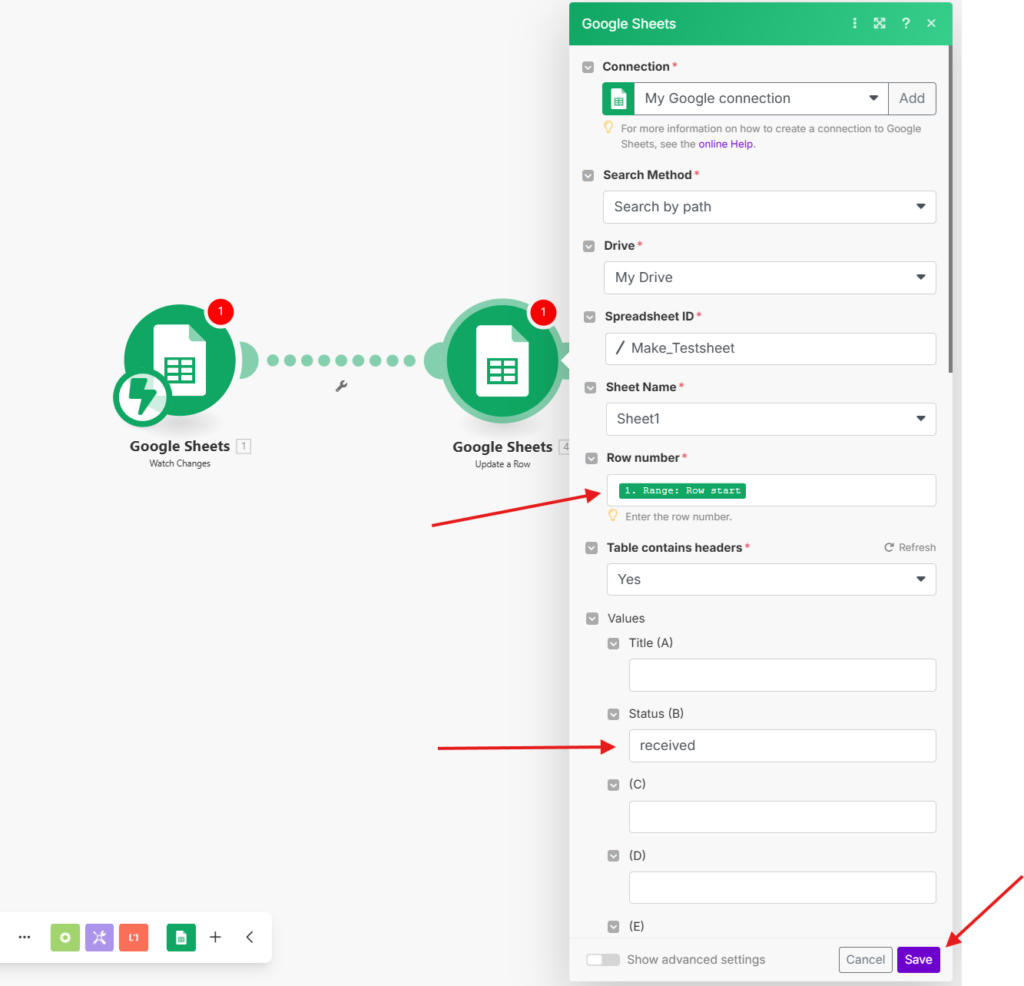
After successfully connecting to your google account, you can continue with configuring the “Update a row” action.
Leave Search Method as “Search by path”:
Select your Google Drive. (Mine is just called “My Drive”)
Select the Spreadsheet ID (In this case “Make_Testsheet”) and Select “Sheet1” as your Sheet Name.
For Row Number, you need to select “Range: Row start” from the parameters, that have been sent by the first workflow step “Watch Changes”. This is fine as long as we are actively watching each row and don’t sent multiple rows to our Make Automation.
For the Values, we are going to update the “Status” column. Type in “received” in the text field below.
Click on Save and you are ready to test!
Save and test your automation
The last thing we need to is to validate our workflow.
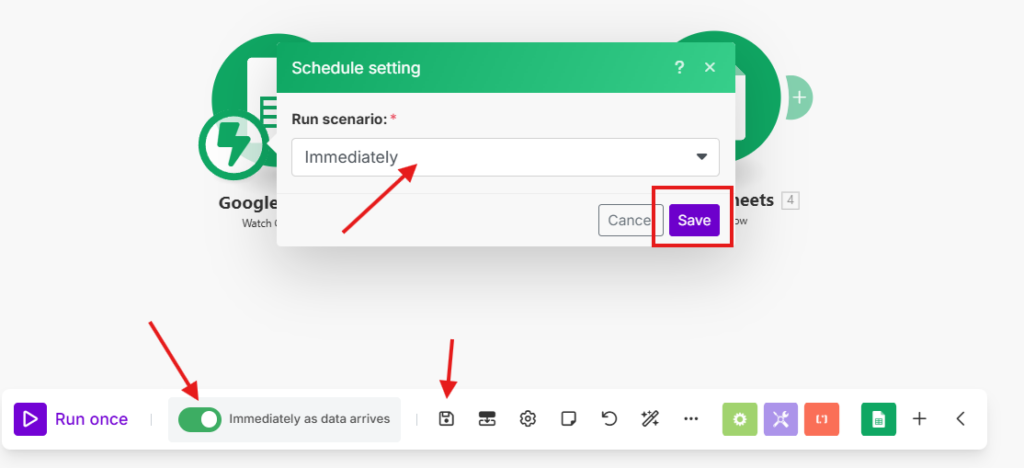
Click on the small save icon at the bottom and turn on the switch for “Immediately as data arrives”.
A new pop-up will appear where you can adjust a delay in the workflow trigger. For now, leave it as “Immediately” and click on Save.

And now we come to the fun part! Testing our automation!
Add any kind of text to the “Title” column in a new row.
And…
simply wait…
The cell to the right will automatically be updated and the text “received” in it.
Done. Congratulations! Your Make workflow is now actively watching new entries in your Google Sheets.
Conclusion
We’ve learned how to connect Make and Google Sheets so that your Make Automation can actively watch your Google Sheet and trigger an automation as soon as you add new data.
The only two things you need are a Google account (with Google sheets) and a (free) Make.com account.
From here on, you can extend the workflow by any means. You can use it for Customer Onboarding or include AI and streamline your Content Generation process.
If you want to learn more about possible AI Automations, feel free to check out my AI Automation Beginners Guide !
