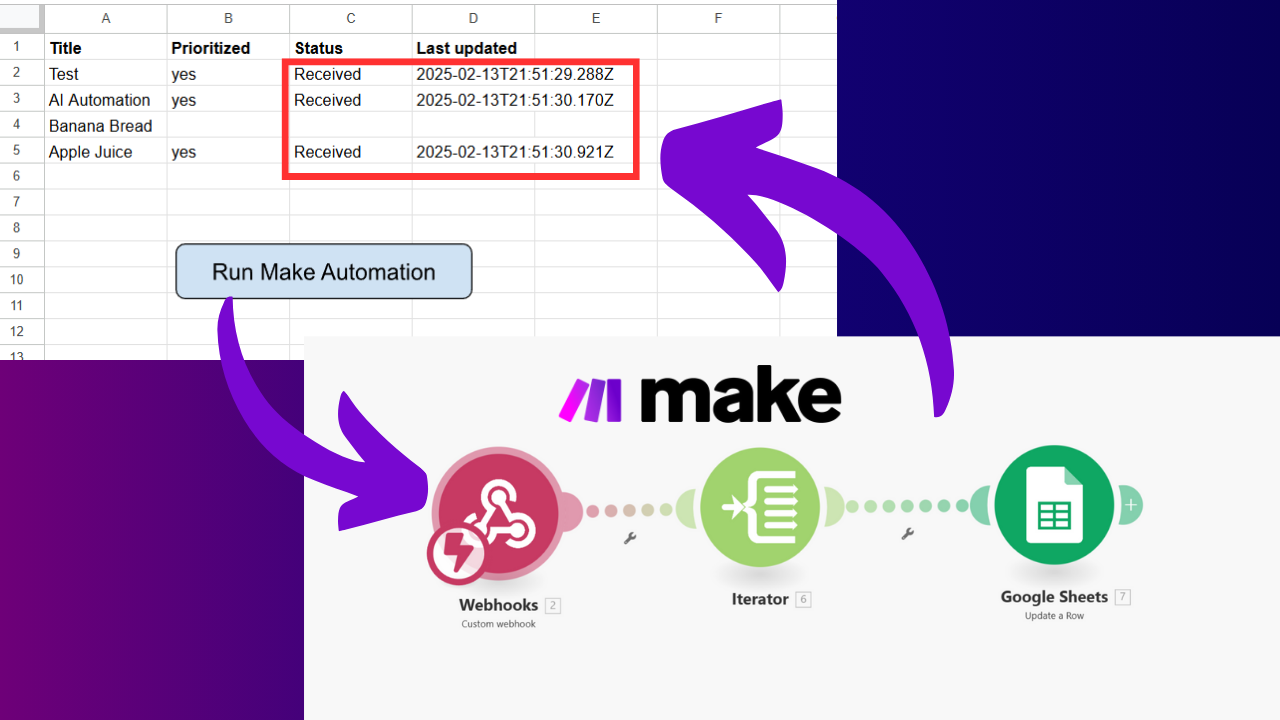
You have a Google sheet and want to manually trigger an Automation that sends some of your rows to your Make workflow.
I am going to show you how to easily set this up by using a Google Script and a Make webhook.
If you want to trigger the Make scenario as soon as you update a row, you should look at another tutorial where I explained how to watch changes in Google Sheets from a Make scenario.
Table of Contents
ToggleHow this workflow functions
This workflow is based on a Google Sheet and a button that triggers a Make Automation via a webhook.
The idea is to work on the Google Sheet and use it for brainstorming and collecting ideas. However, not all of these row should be processed by an automation.
Every idea/title that should be processed will be marked with “yes” in the prioritized column.
By clicking the button, it will run a Google Script that searches for rows that are prioritized and sends them to the Make webhook, which triggers the workflow run.
The workflow itself will then process the rows thas have been sent via webhook and update these rows directly in Google Sheets by setting the status to “received” and adding the processed date.
What do you need for this workflow
You need two things for this workflow:
- Make.com account to set up the automation workflow
- Google Sheets
Make sure you have both set up before you continue.
Set up a new scenario in Make

First things first, we are going to create a new scenario for our workflow.
For this, navigate to Make.com and Log into your account (or create a free one).
Click on Scenarios in your left menue and Create a scenario.
Create a new Webhook Trigger
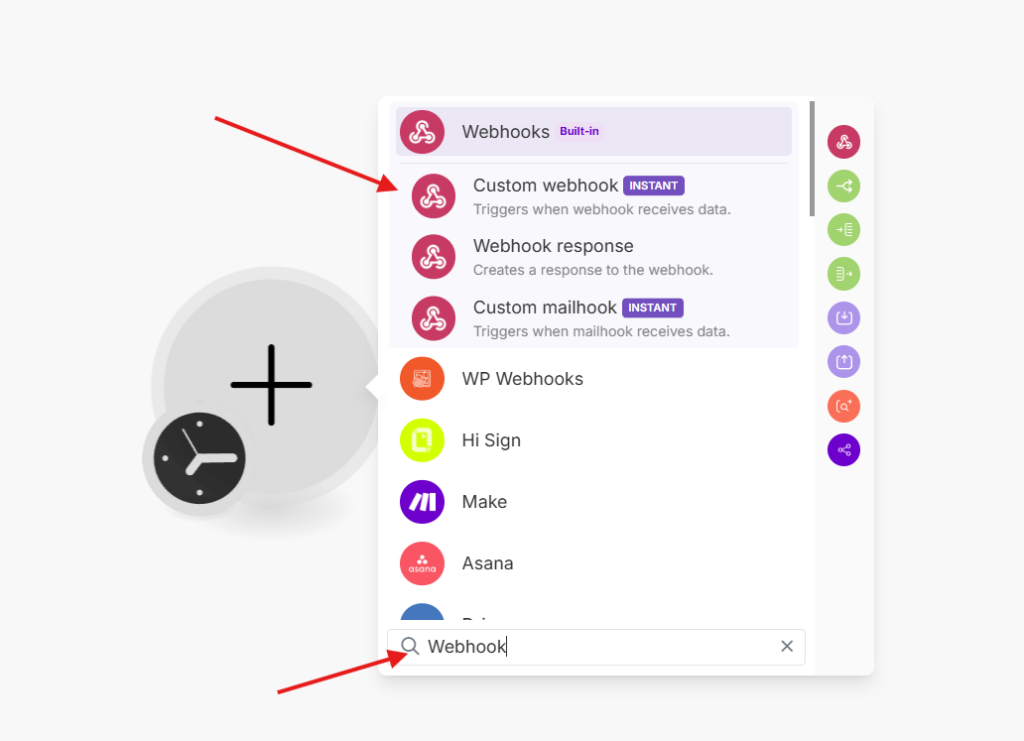
The first workflow step will be a webhook that can receive calls from outside the Make scenario.
Click on the Plus Button to open up the Node overview.
Search for Webhook and select the “Custom Webhook” action. (Be aware to not select “custom mailhook” by accident)
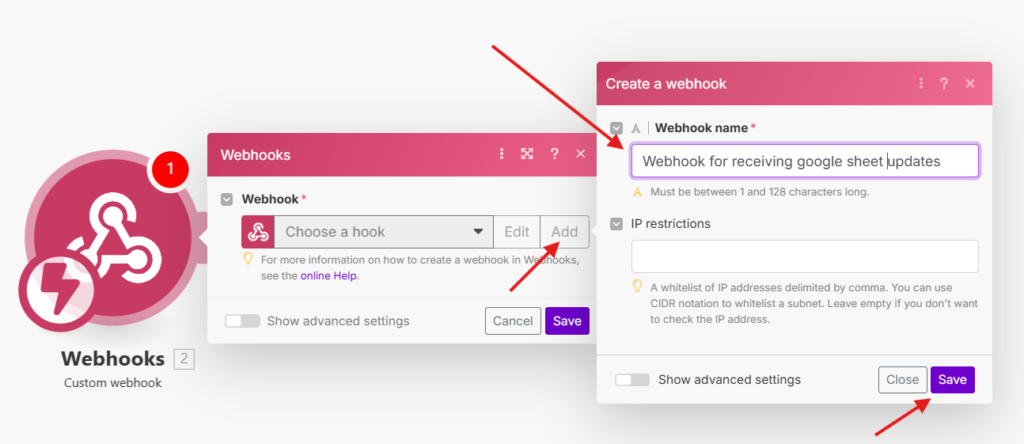
When configuring the webhook, click on Add to create a new webhook.
Give your webhook a readable name so you can find it afterwards and monitor properly.
Leave IP restrictions blank for now and continue by clicking on Save.

Now, the webhook has successfully been created.
Click on “Copy adress to clipboard” to save it for the next steps.
Set up and prepare the Google Spreadsheet

Now, we will create the actual Google Spreadsheet.
Navigate to https://docs.google.com/spreadsheets/u/0/ , log into your Google Account and create a new sheet by clicking on “Blank Spreadsheet”.
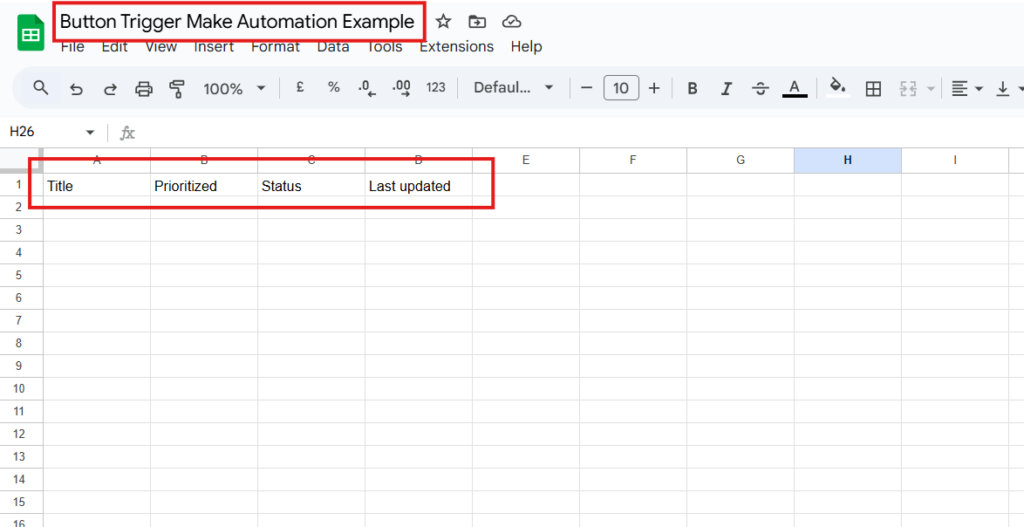
Next, we will give the Spreadsheet a name. For now, I would suggest to pick the same Name as in the example to prevent confusion.
Also, we will already prepare our header.
Write “Title”, “Prioritized”, “Status”, and “Last updated” into the first row like you see in the example above.
Create a Button in Google Spreadsheet
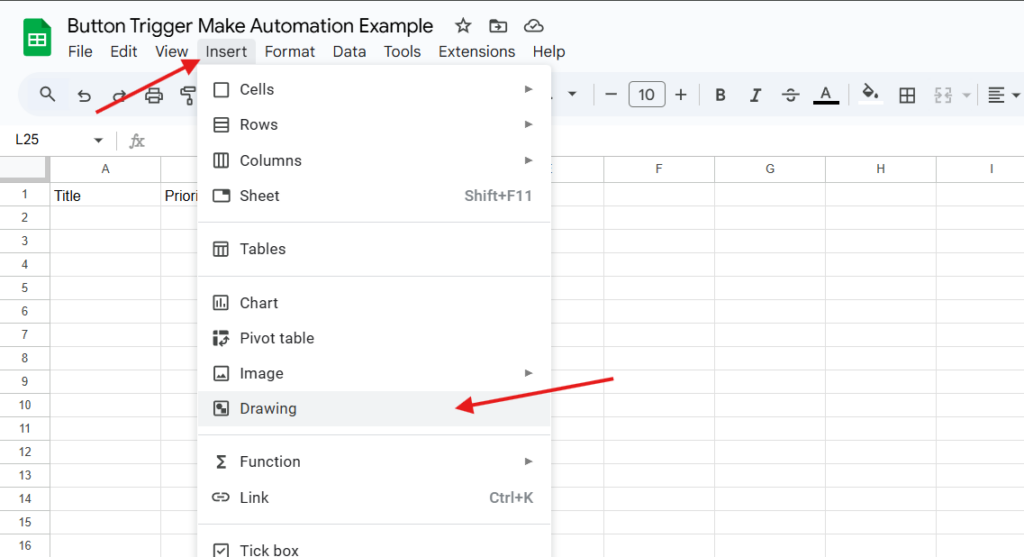
To be able to manually trigger the Make workflow, we also need to create a Button in Google Sheets.
Unfortunately, Google Sheets does not provide a standard button object, so we have to do a little workaround.
On the top menue of your sheet, navigate to “Insert” and click “Drawing”.

Inside the Drawing, you can now select a shape for the button. In theory, every shape should work but I choose the ‘standard’ rounded rectangle.

Draw the button and add the button text to indicate it’s functionality.
Click “Save and close” to continue.

Your Button drawing has appeared on your spreadsheet. Feel free to move it around to where it fits best for you.
Create a Google Script to trigger the webhook

Now, we need to define a little bit of logic into the button so that it will be able to call the webhook.
For this, we are going to create a Google Script.
Navigate to “Extensions” and select “Apps Script”.

Before we start with the script, give your Apps Script project a name.
Then, you can copy the code-snippet below.
Replace ‘myFunction’ in the Google Script editor with the code-snippet and replace your webhook URL that you have copied before.
(If you have forgotten to copy it, don’t worry. Just go back to your Make scenario, click on the Webhook node and copy the webhook Url)
function triggerWebhook() {
  var webhookUrl = "https://hook.eu2.make.com/5b******************q"; // Replace with your webhook URL
  var sheet = SpreadsheetApp.getActiveSpreadsheet().getActiveSheet();
  var data = sheet.getDataRange().getValues();
  var headers = data[0]; // Assume first row is headers
  var prioritizedIndex = headers.indexOf("Prioritized");
  var statusIndex = headers.indexOf("Status");

  if (prioritizedIndex === -1 || statusIndex === -1) {
    Logger.log("Columns 'Prioritized' or 'Status' not found.");
    return;
  }

  var matchingRows = [];

  for (var i = 1; i < data.length; i++) {
    var prioritized = data[i][prioritizedIndex];
    var status = data[i][statusIndex];

    if (prioritized === "yes" && (status === "" || status.toLowerCase() === "draft")) {
      matchingRows.push({ rowNumber: i + 1, data: data[i] });
    }
  }

  if (matchingRows.length === 0) {
    Logger.log("No matching rows found.");
    return;
  }

  var payload = {
    rows: matchingRows
  };

  var options = {
    method: "post",
    contentType: "application/json",
    payload: JSON.stringify(payload),
    muteHttpExceptions: true
  };

  try {
    var response = UrlFetchApp.fetch(webhookUrl, options);
    Logger.log("Response: " + response.getContentText());

  } catch (error) {
    Logger.log("Error triggering webhook: " + error.toString());
  }
}
Expand to learn more about the code
Line 1 – Is the name of the actual function “triggerWebhook” which will be called from Google Sheets.
Line 2 – Is where we define the webhook Url. Make sure to replace this string with your personal webhook Url
Line 3-7 – Loading the current google sheet, it’s contents, and headers.
Line 9-11 – Validating that the columns “Prioritized” and “Status” exist.
Line 14 – Creating an empty array variable that will be used to collect all row data that matches our filter criteria
Line 16-28 – Going row by row, filtering for prioritized rows (prioritized = yes) that have no status (or are in draft). If they match this criteria, they’re being added into our matchingRows array including the row number itself. If the script has checked all rows but there are none that match the criteria, it will end the run here.
Line 30-32 – Adding the matching rows into the payload. The payload will be needed pass through information to the webhook.
Line 34-38 – options – object is defined with the HTTP method and some header information that are needed to be passed to our webhook, including the payload.
Line 41-48 – Trying to call the webhook and adding the options. Try-catch is a common best-practice when calling APIs or webhooks because it functions like a failover that will be able to handle both positive as well as negative results, without breaking the script/app.

Another reminder to replace the webhookUrl variable with your own webhook URL you have copied from your Make scenario.
After replacing it, click the save icon and run the script to test it.
Allow the deployment

If it’s the first time executing the script, Google Script will require some additional permissions.
Click on “Review permissions” to continue.
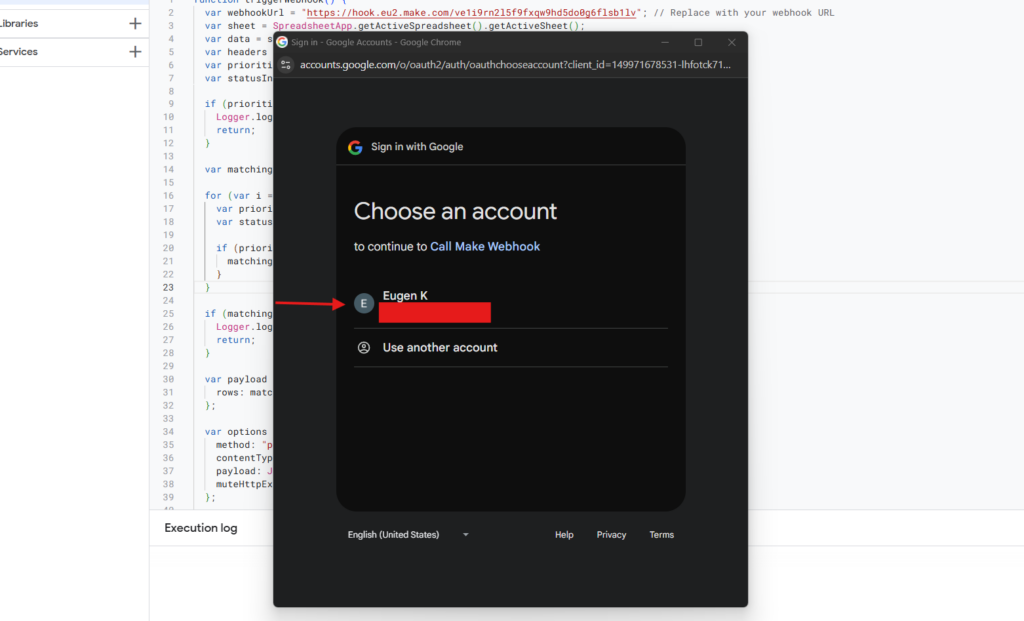
Select the same Google Account that will also use Google Sheets.
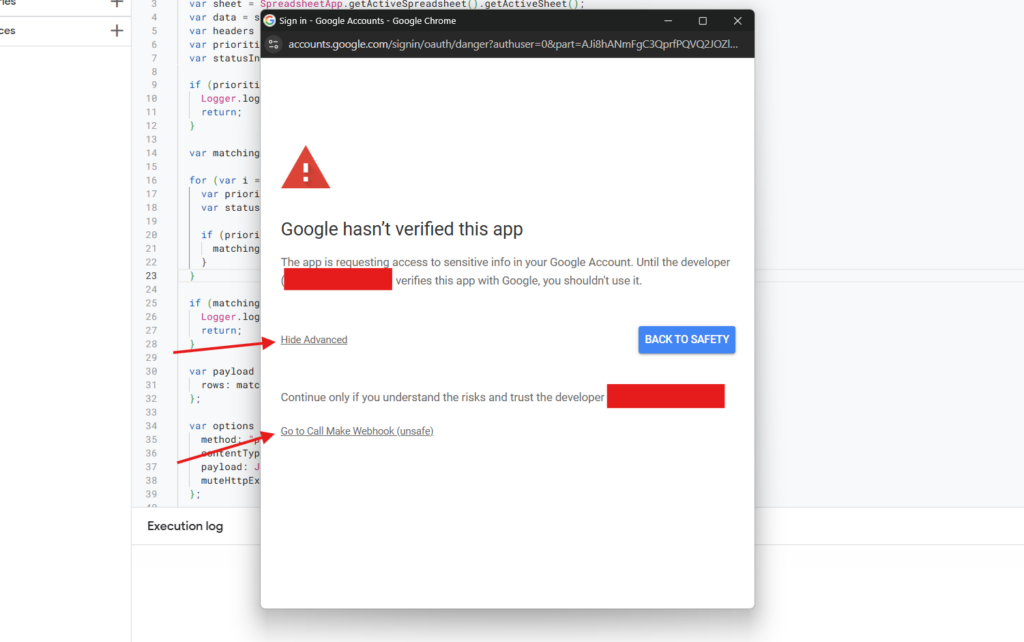
Because the Script will not be a Google verified app and only used internally, we can safely ignore the security information as it is our own script and we have full control over it.
In this case, you can trust the developer, which is yourself.
Click on “Advanced” and go back to your Google Script project (in this example “Go to Call Make Webhook (unsafe)”)
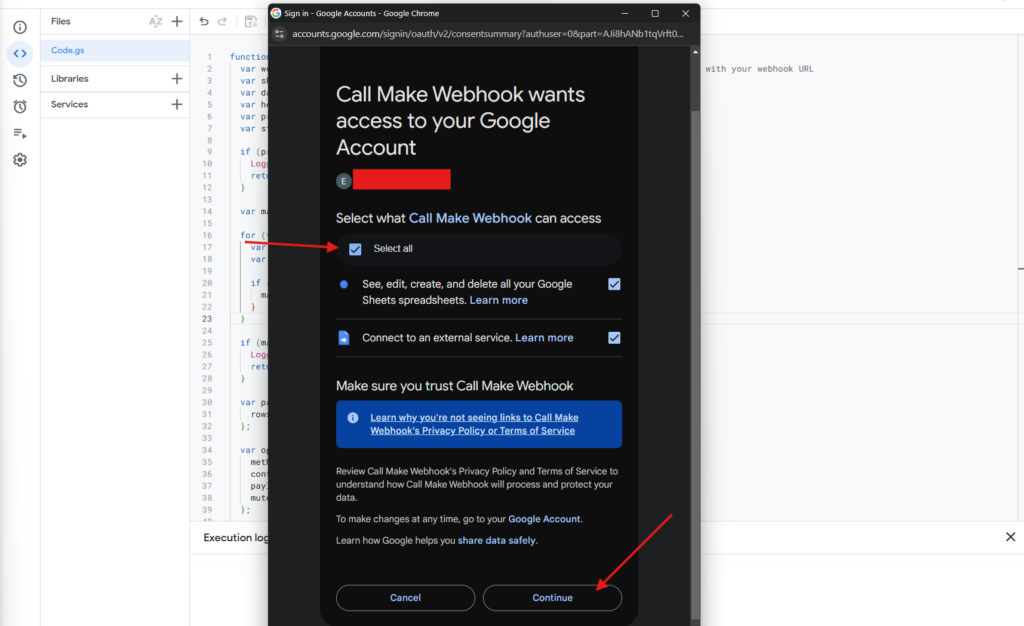
Activate the checkbox “Select all” to grant full access and continue.
The script will run once but most likely fail. Probably saying that there is “no scenario listening to this webhook”.
But this behaviour is expected for now because the didn’t finish the Make automation, yet!
Assign the Google Script to your Button
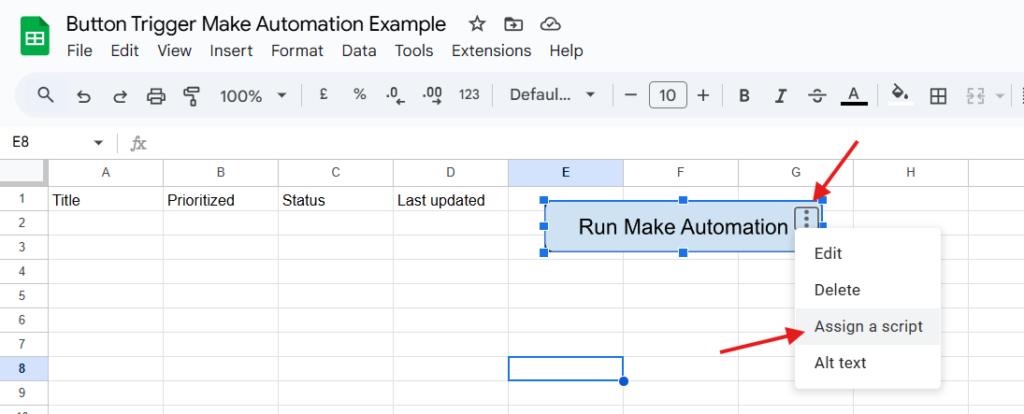
Now, we want to run this script every time we clicked the “Run Make Automation” Button.
So we need to assign the script to the button.
To do so, activate the button with a right-click, select the three dots to open the menu and click on “Assign a script”.
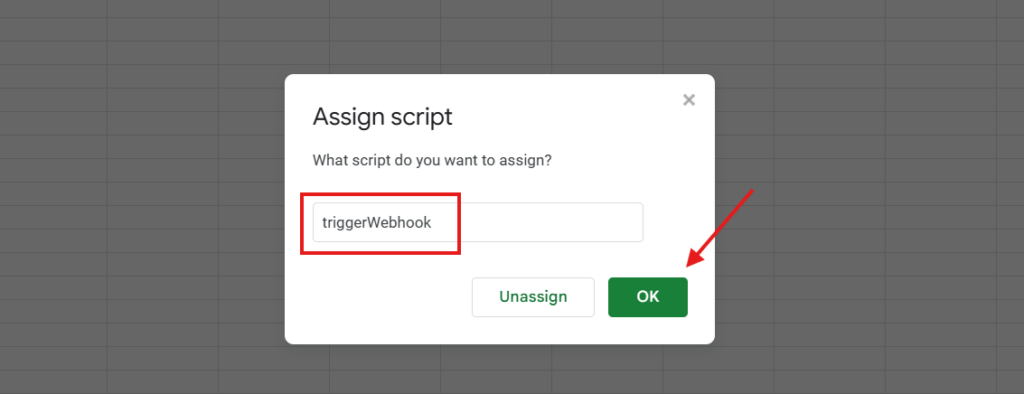
Type in “triggerWebhook” into the script field. If you have renamed the function, paste in your function name accordingly.
Now, Google Sheets is successfully configured and we can continue with make. But we will come back very soon to Google Sheets, so don’t close the window/tab!
Continue with Make Workflow
Determine Data Structure
So far, we have only defined the data structure in our Google Script.
But we also want our Make Automation to handle this data structure, so we need to determine it within Make.
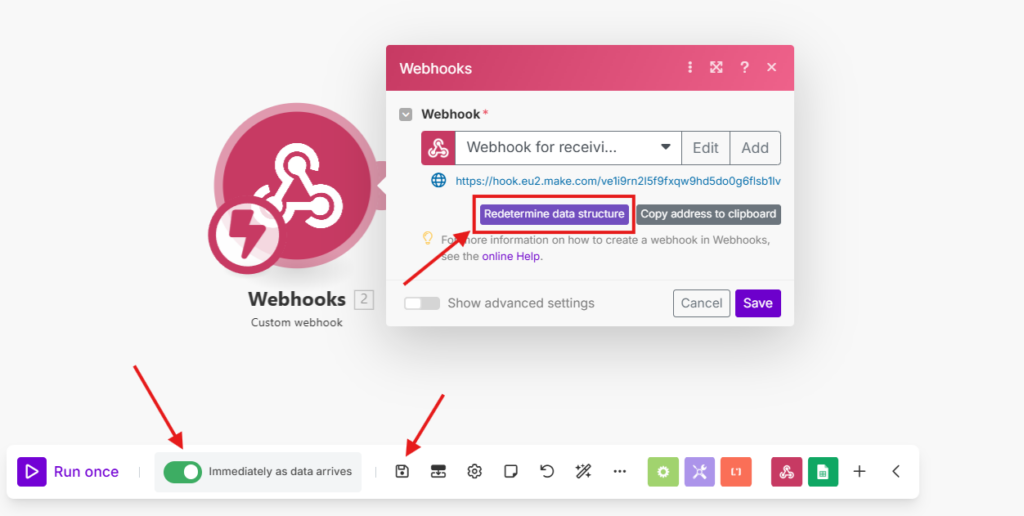
The easiest way to do so is to let our Make scenario determine the data structure automatically.
To do so, click on “Determine data structure” within your Webhook Node.
A green spinning wheel should appear. Do nothing with it and go back to your Google Sheet.
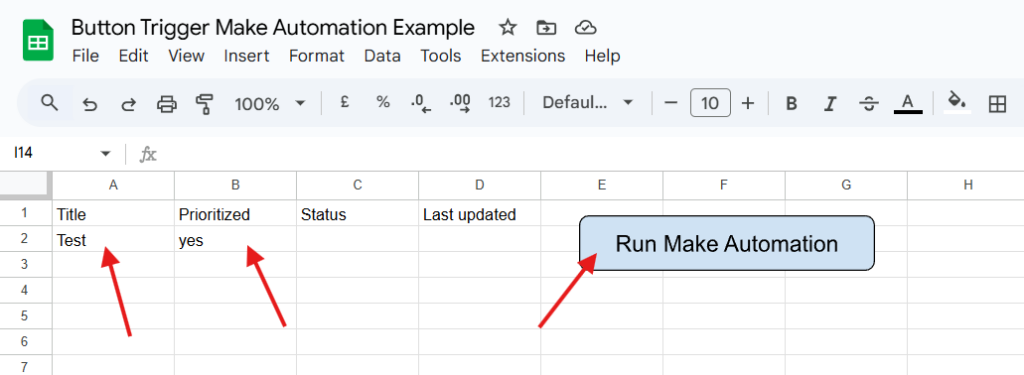
Next, we will send a test payload to our Make Automatoin so that the webhook node can determine the sent data structure.
Add a new “Test” title and a “yes” into the prioritized column.
Now, click on your Button “Run Make Automation” to run the script and trigger the webhook.
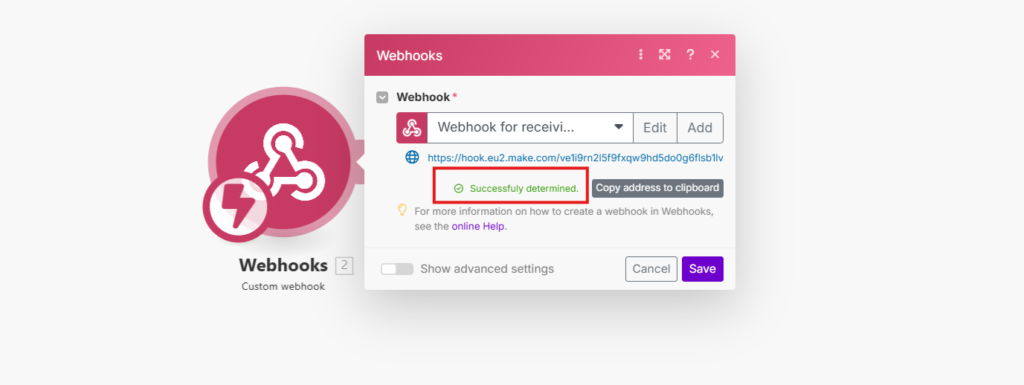
When you go back to your Make scenario, your Webhooks node should now display a “Successfully determined” status.
This means, that the webhook has received the call from your Google Sheet.
Note: If the call couldn’t be received, save and activate your scenario before trying again.
Use Iterator to handle multiple updated rows
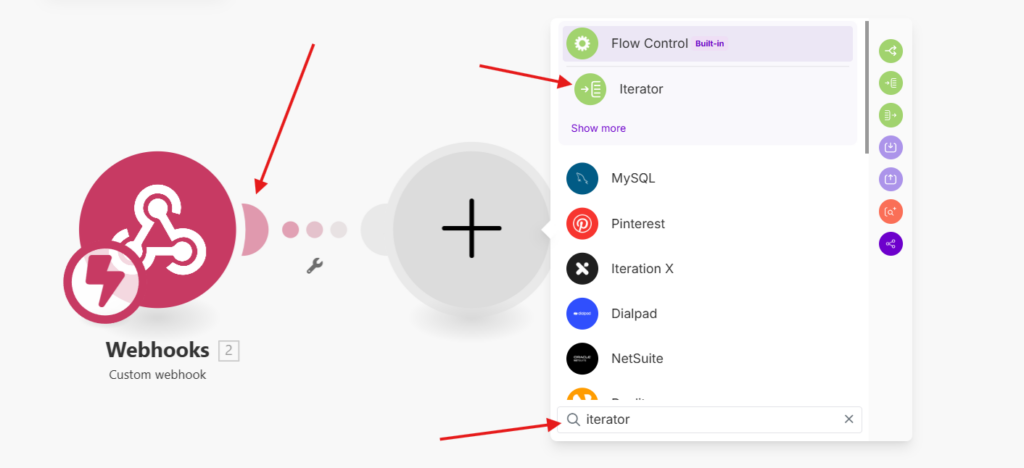
We want to be able to handle multiple rows in one workflow run.
To enable the processing of the array, we need to add an Iterator that will trigger the following steps for each row that we receive through the webhook.
Click on the small + icon on the right of the Webhooks Node, Search for Iterator and select the Iterator action in the Flow Control node.

Now, we will configure the Iterator to trigger the following node for each row.
Click in the Array textbox and select the rows[] array that is under the Webhooks-Custom webhook node.
Update Google Sheet rows
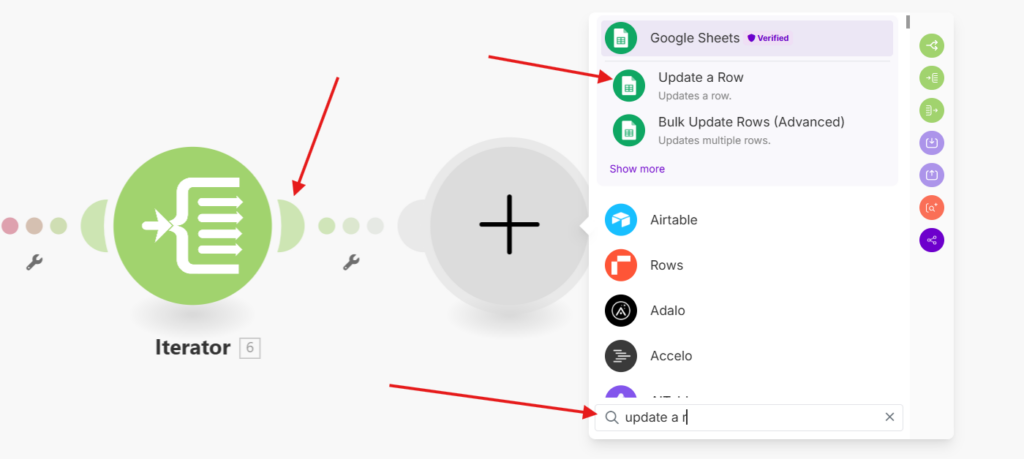
Next, we will add another step that will be called by the iterator.
The next step will be an “Update a row” action.
Click on the little plus, right to the Iterator, search for “Update a row” and select the “Update a Row” action in the “Google sheets” node.
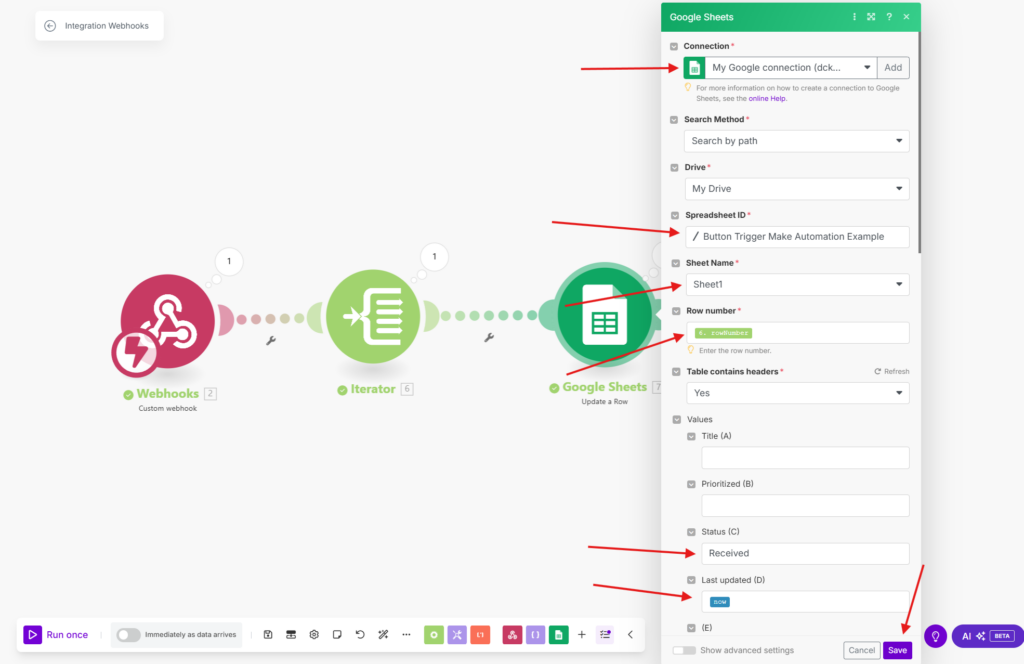
The first thing when configuring the “Update a row” action will be to select the connection to your Google account where you have your Google Sheet. If you haven’t set up your Connection, yet, you can do so by clicking on “Add”, selecting your Google account and granting the required permissions.
Then, continue with the configuration:
Spreadsheet ID – Select the Spreadsheet that you have created before.
Sheet Name – Select the spreadsheet name. By default, it’s “Sheet1”
Row number – Select the rowNumber variable that is passed through by the iterator step.
Status (C) – Add a “Received” to the text box so that the Sheet will be updated with this string and future runs will ignore this row.
Last updated (D) – Add the Datetime variable “now” to save the current time of the workflow run.
Click Save to continue.
Save and test your automation
Now, we have successfully set up out whole automation process with Make.com and Google Sheets.
The only that’s left is to actually test everything.
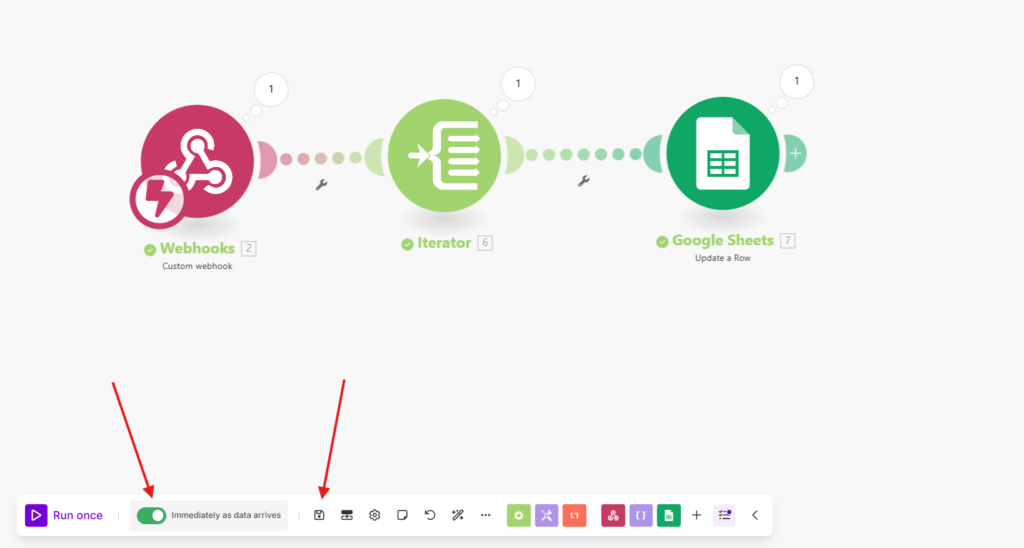
To save the scenario, Click on the save icon and active the checkbox “Immediately as data arrives”.

Now, you can prepare multiple rows to test the functionality. Add some titles and a few “yes” into the prioritized columns.
Leave at least one item that is not prioritized so you can test whether the filtering works as well.
Click on the Button “Run Make Automation” to trigger the workflow.
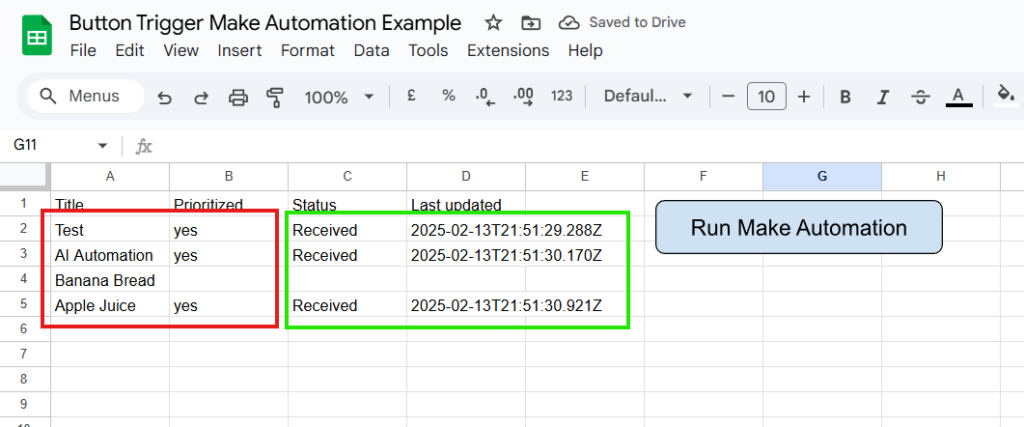
After a few seconds, you should see the Status and Last updated columns being updated as well.
Congratulations, your workflow is now ready!
Conclusion
We’ve learned how to create a Google sheet and trigger a Make workflow automation with a Button.
The only things we needed for this workflow, were a Google account with Google sheets, a custom Google Script, a Make Scenario and a webhook for the communication.
This basic workflow set up allows you now to extend it even further. For example to build a whole AI-powered Content generation pipeline.
If you are interested to learn more about AI Automation itself, you could read my article about AI Automation basics.
